Analyses
Techstep Essentials MDM + Pradeo
Your digital bodyguard who never sleeps (and never takes a vacation)
filtruj po kategorii
Filtruj po autorze

Your digital bodyguard who never sleeps (and never takes a vacation)

How Samsung closes doors that others don't even see
A practical guide to Intune and Knox Manage

Samsung split Knox Suite into three plans: Base, Essentials, and Enterprise (plus a somewhat hidden Companion Plan). Sounds like a sensible restructuring? Probably looked great on...

In-depth analysis for small, medium-sized, large enterprises, and the public sector (2024/2025)

MDM – managing devices in an organization

A comprehensive guide that will save you dozens of hours
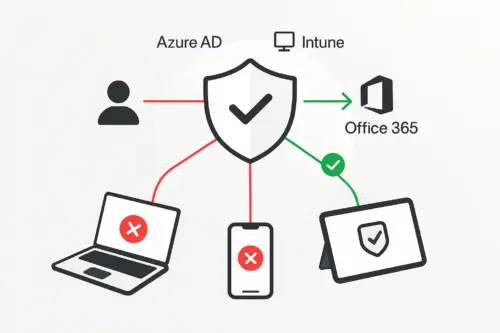
How EMM/MDM fits into modern security architecture
So Samsung has created an MDM tool that speaks three languages fluently
Apple has swept the board! MDM migration, iPhone login, and other new features
Mobile Threat Defense (MTD) is a topic that is still treated as a stepchild in many companies.
Let’s not kid ourselves – most of you, when thinking about smartphone security, picture a PIN code, encryption, and possibly remote data wiping when an employee leaves their phone in a taxi. This is the absolute basics, digital hygiene. But in 2026, this is definitely not enough.
Why? Because thieves and hackers have also moved with the times. Today, no one steals a phone to sell it at a pawn shop for parts (okay, it happens, but it’s marginal). Today, a phone is a gateway to your cloud data, to Microsoft 365, to Salesforce, to banking. And the key to this gateway is no longer a crowbar, but sophisticated phishing, a malicious „flashlight” app that reads SMS messages, or fake Wi-Fi in a hotel lobby.

That’s why today we’ll take a look at a solution we know well – TechStep Essentials MDM (formerly Famoc), but this time paired with Pradeo technology.
What is it, how does it work „under the hood,” and why is it worth your attention? Let’s dive in.
If you’re in the security industry, you’ve probably heard this name. Pradeo is a French company (I emphasize: French, meaning European, which matters – but more on that later), which is one of the world leaders in Mobile Threat Defense (MTD). It’s a company that from day one has focused on one thing: protecting mobile devices and applications. And it does it well enough to be featured in reports by Gartner, Forrester, IDC, and Frost & Sullivan as a leading provider in the MTD category.
So in short: Pradeo is like a very intelligent digital bodyguard that sits inside your phone and analyzes everything that happens. But it doesn’t work like a classic ’90s antivirus that scans files looking for signatures (though it does that too). Pradeo works behaviorally. It looks at the behavior of applications, networks, and the operating system.
Protection is based on three pillars / attack vectors (so-called 360-degree protection):

And this is where Pradeo shines brightest. The system analyzes actual application behavior, not just declared permissions. The difference is colossal. Take TikTok (every admin’s favorite…) — in its permission declarations it looks innocent, but behavioral analysis reveals that the app collects geolocation, contacts, messages, call history, and even financial data. Pradeo detects this and classifies it as an invasive application.
The same applies to 0-day malware — malicious software that doesn’t yet have a virus signature in any database. According to Pradeo, as much as 95% of mobile threats are 0-day. Traditional antiviruses don’t see them. Pradeo detects them based on behavioral analysis — it observes what the app actually does (whether it records audio, sends data to suspicious servers, tries to install other apps, modifies system files), rather than looking for it on a blacklist.
At the application level, Pradeo also detects:
Here Pradeo detects:
A MitM attack on public Wi-Fi is not a theoretical threat. During one of TechStep’s webinars, they cited a case from Germany where soldiers lost confidential data precisely by connecting to public Wi-Fi. Pradeo detects such attacks in real-time and disconnects the device from the dangerous network.
That is, everything admins „love” most: root/jailbreak, operating system vulnerabilities, outdated OS versions, host file modifications, debugging and developer mode. From SDK version 1.6.0, hook detection was also added — attempts to hook into running processes.
Okay, you’ll say: „Tomek, but MTD is nothing new. We have Check Point, Zimperium, Lookout.” Agreed. However, there are three types of solutions operating in the mobile security market, and it’s worth distinguishing them:
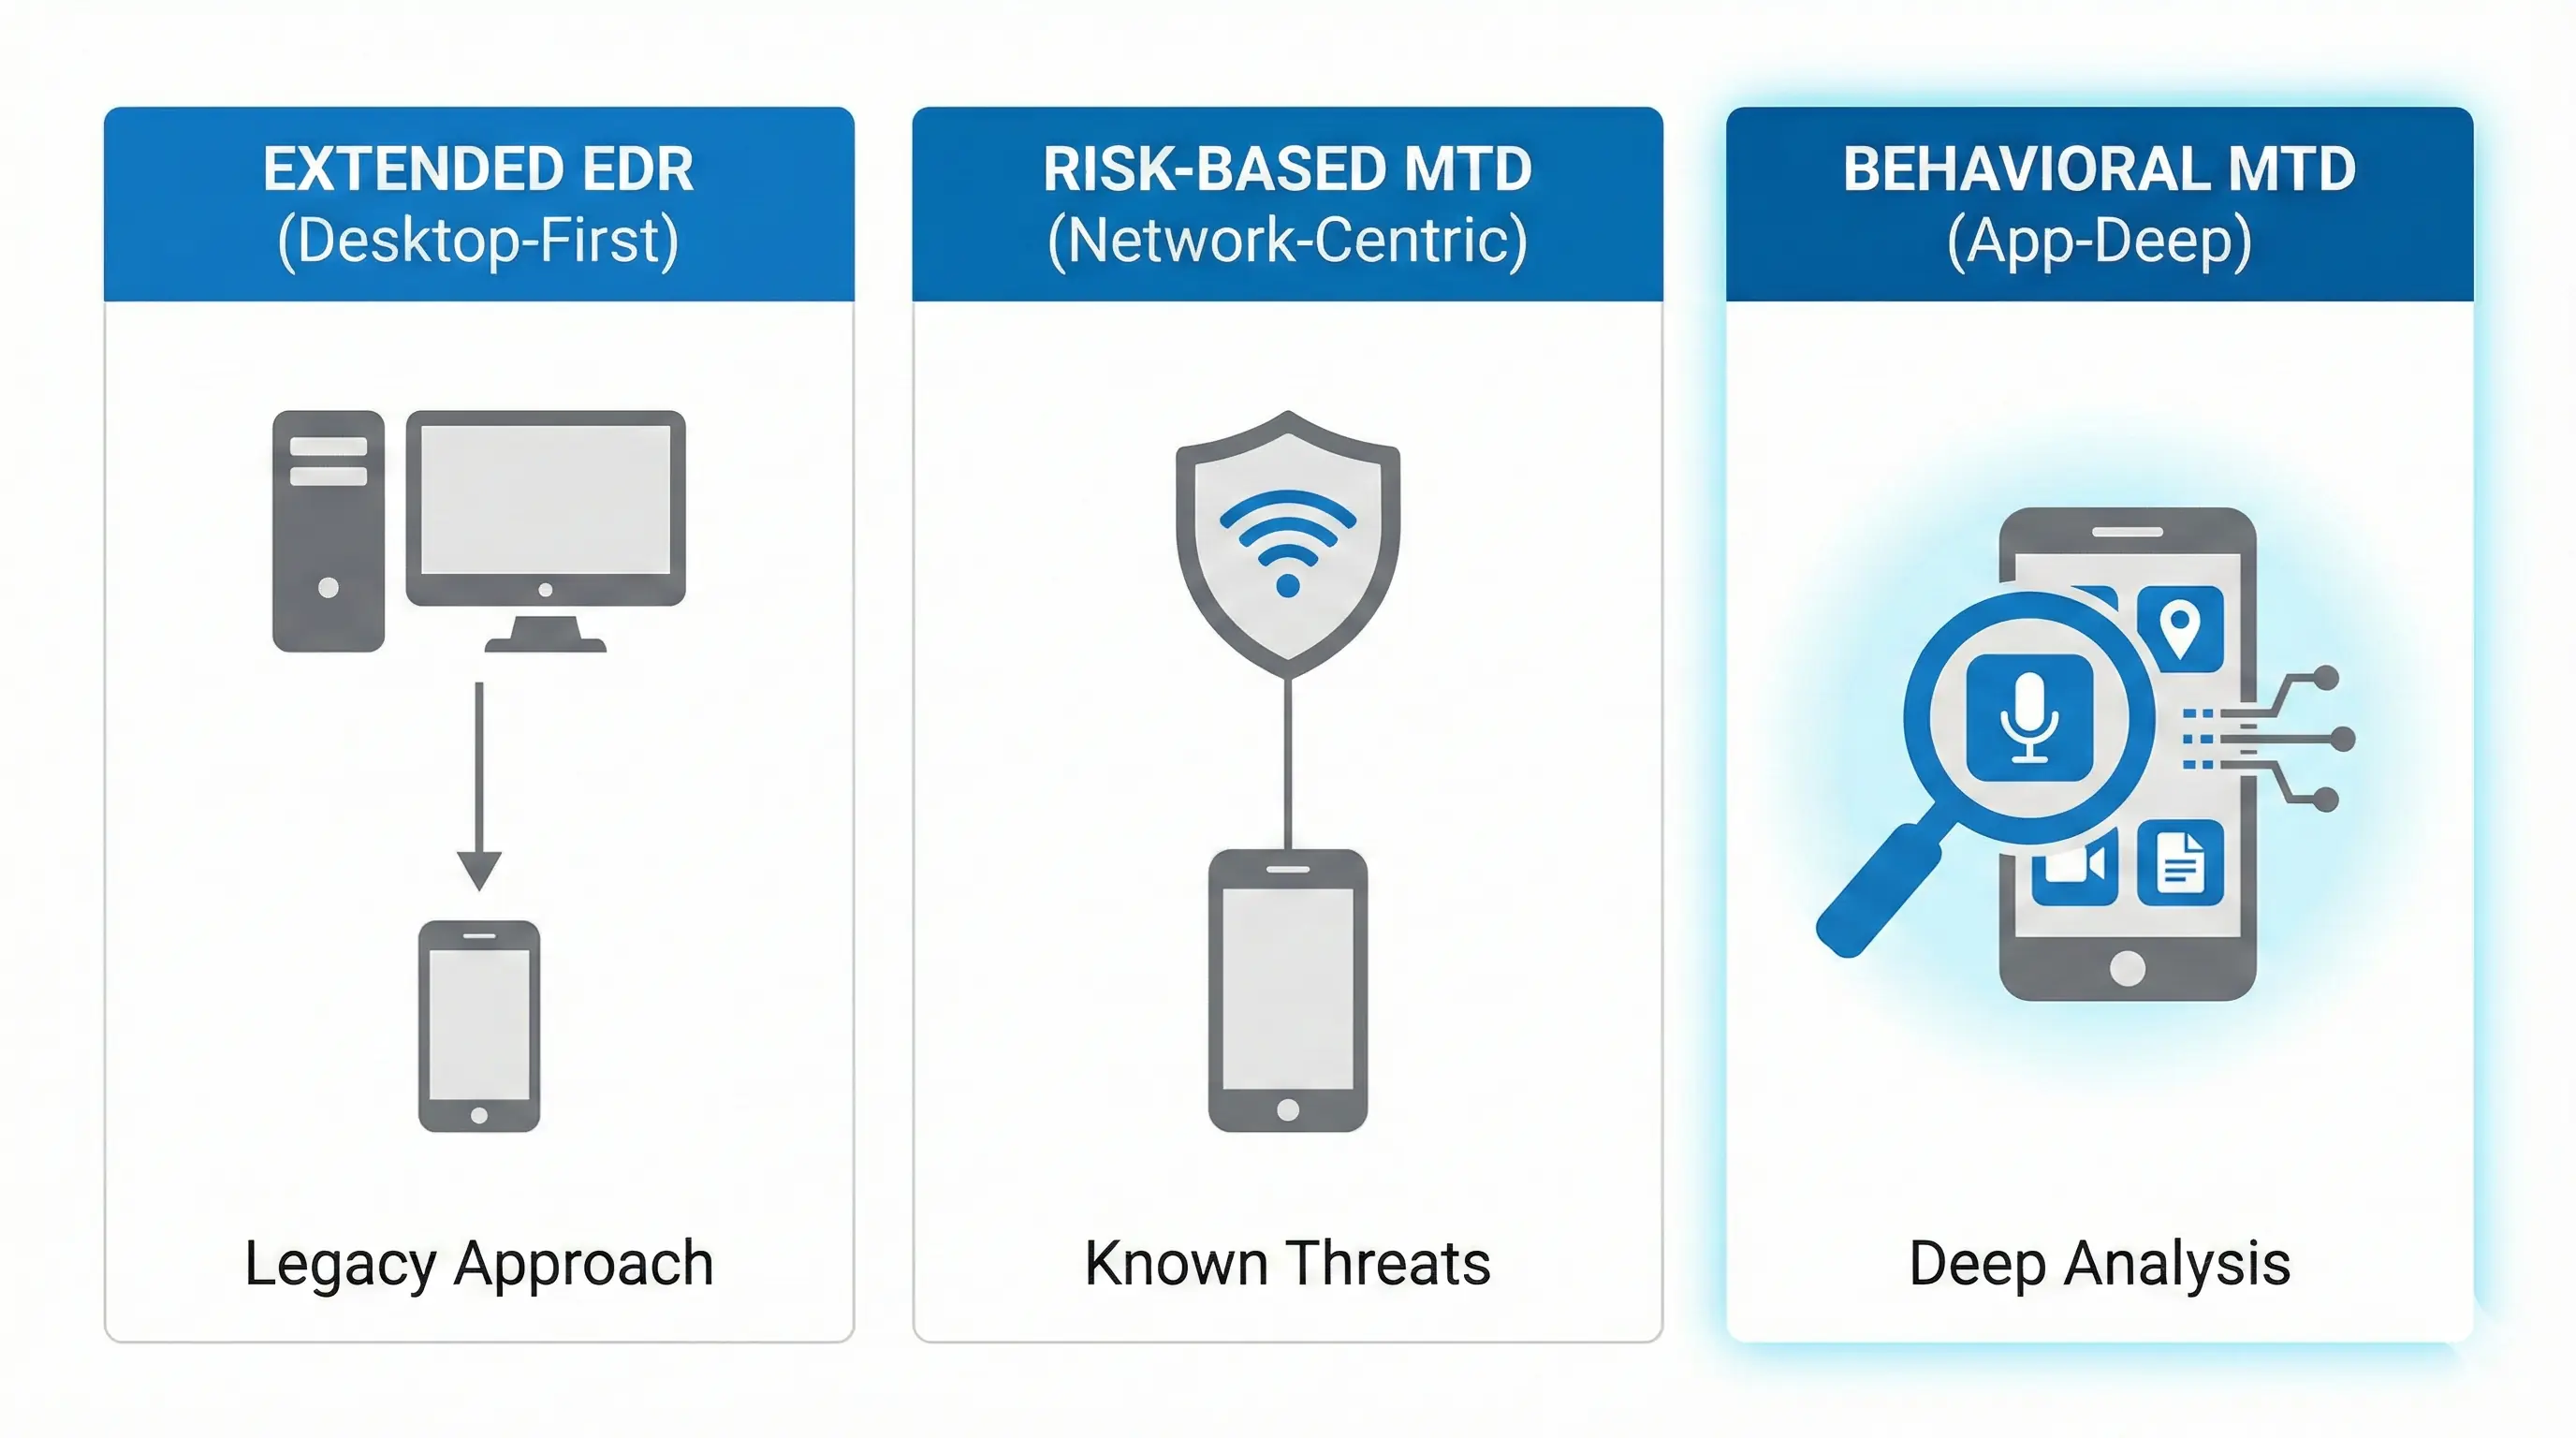
MTD with deep behavioral analysis (Pradeo): This is Pradeo’s approach. The AI engine analyzes millions of applications and understands what is normal behavior and what is an anomaly. This allows detection of 0-day threats and invasive applications that technically aren’t malware.
EDR extended to mobile (CrowdStrike, TrendMicro, MS Defender): They originate from PC. They often don’t understand mobile specifics (containerization, sandboxing).
MTD based on risk analysis (CheckPoint, Zimperium, Lookout): Solid in network, but at the application layer they often limit themselves to known threat databases.
| Criterion | EDR extended to mobile | Risk-based MTD | Behavioral MTD (Pradeo) |
|---|---|---|---|
| Technology origin | Desktop/server protection | Network security / consumer | Dedicated mobile security |
| Example providers | CrowdStrike, TrendMicro, Microsoft Defender | CheckPoint Harmony, Zimperium, Lookout | Pradeo |
| Mobile expertise | Limited — PC logic transferred to mobile | Medium — focus on network and known signatures | Deep — 10+ years exclusively mobile |
| 0-day malware detection | Weak — based on signatures from PC ecosystem | Partial — mainly known patterns | Yes — AI behavioral analysis |
| Application behavior analysis | No — checks signatures, not behaviors | Partially — declared permissions | Yes — actual behaviors vs declarations |
| Invasive app detection | No | Limited | Yes — TikTok, Temu, Facebook, etc. |
| Android Enterprise dual-profile protection | Limited | Partial | Full — both profiles with privacy maintained |
| Data processing | Vendor cloud (often outside EU) | Vendor cloud | On-device + European cloud |
| Knowledge of mobile specifics (sandbox, containerization) | Low | Medium | High |
| Feature | Pradeo | CheckPoint Harmony | Zimperium | Lookout | CrowdStrike (Falcon Mobile) |
|---|---|---|---|---|---|
| 0-day malware detection (behavioral) | ✅ | ⚠️ Partially | ⚠️ Partially | ⚠️ Partially | ❌ Based on signatures |
| Actual app behavior analysis | ✅ | ❌ | ⚠️ Limited | ⚠️ Limited | ❌ |
| Invasive app detection (non-malware) | ✅ | ❌ | ❌ | ⚠️ Partially | ❌ |
| Both Android Enterprise profiles protection | ✅ | ⚠️ Partially | ⚠️ Partially | ⚠️ Partially | ❌ |
| Phishing/smishing/quishing | ✅ | ✅ | ✅ | ✅ | ⚠️ Limited |
| Man-in-the-middle detection | ✅ | ✅ | ✅ | ✅ | ⚠️ |
| Rogue cell tower detection | ✅ | ❌ | ✅ | ❌ | ❌ |
| Root/jailbreak detection | ✅ | ✅ | ✅ | ✅ | ✅ |
| Hook detection | ✅ (from SDK 1.6.0) | ❌ | ✅ | ❌ | ❌ |
| On-device antivirus scanning | ✅ (from SDK 1.6.0) | ✅ | ❌ | ❌ | ✅ |
| On-device protection (offline) | ✅ (Core layer) | ⚠️ Partially | ✅ | ⚠️ Partially | ⚠️ Partially |
| GDPR compliance report per app | ✅ | ❌ | ❌ | ❌ | ❌ |
| Log export to EMM/UEM | ✅ | ✅ | ✅ | ✅ | ✅ |
| European infrastructure (data in EU) | ✅ (OVHcloud FR/DE) | ❌ (Israel/USA) | ❌ (USA) | ❌ (USA) | ❌ (USA) |
| Government certification (CCN/CIPSTIC) | ✅ | ❌ | ❌ | ❌ | ❌ |
| Native integration with TechStep Essentials | ✅ (SDK in agent) | Via API | Via API | Via API | None |
In the case of TechStep Essentials MTD, we’re dealing with something that we admins love most: total integration.
Usually, MTD deployment looks like this: you have an MDM agent (for management) and you need to install a second application (for protection). This means:
With the TechStep + Pradeo duo, it looks different. Pradeo technology has been embedded directly into the Essentials MDM agent.
| Aspect | MDM only (without MTD) | Separate MDM + MTD (two systems) | TechStep + Pradeo (integrated) |
|---|---|---|---|
| Malware and threat detection | ❌ None | ✅ Yes | ✅ Yes |
| Number of agents on device | 1 | 2 (MDM + MTD) | 1 (shared agent) |
| Number of management consoles | 1 | 2 | 1 |
| Automatic app blocking | ⚠️ Only manually, after the fact | ⚠️ Depends on API integration quality | ✅ Native, real-time |
| Conditional access based on threats | ❌ | ⚠️ Requires connector configuration | ✅ Native — MTD status synchronized with UEM |
| MTD deployment time | — | Days/weeks (separate infrastructure) | Hours (toggle in console) |
| User experience | Neutral | Worse — two agents, two sets of notifications | Unchanged — user sees one app |
| Remediation on Samsung devices (Knox) | ⚠️ Basic | ⚠️ Limited without native integration | ✅ Full — stop activity + removal |
| Offline protection | — | Depends on MTD | ✅ Core layer works without connection |
| Compliance reporting (NIS2, DORA, GDPR) | ⚠️ Only device inventory | ⚠️ Two separate reports | ✅ One dashboard — threats + management |
| On-premise deployment model | Depends on MDM | Usually impossible for MTD | ✅ Full support (10+ year commitment) |
| Data sovereignty | Depends on MDM | Usually MTD data outside EU | ✅ Everything in European infrastructure |
The SDK (Software Development Kit) mechanism is used here. Pradeo’s code is part of the Essentials application. For the user, it’s transparent. There’s no second application. No additional login.
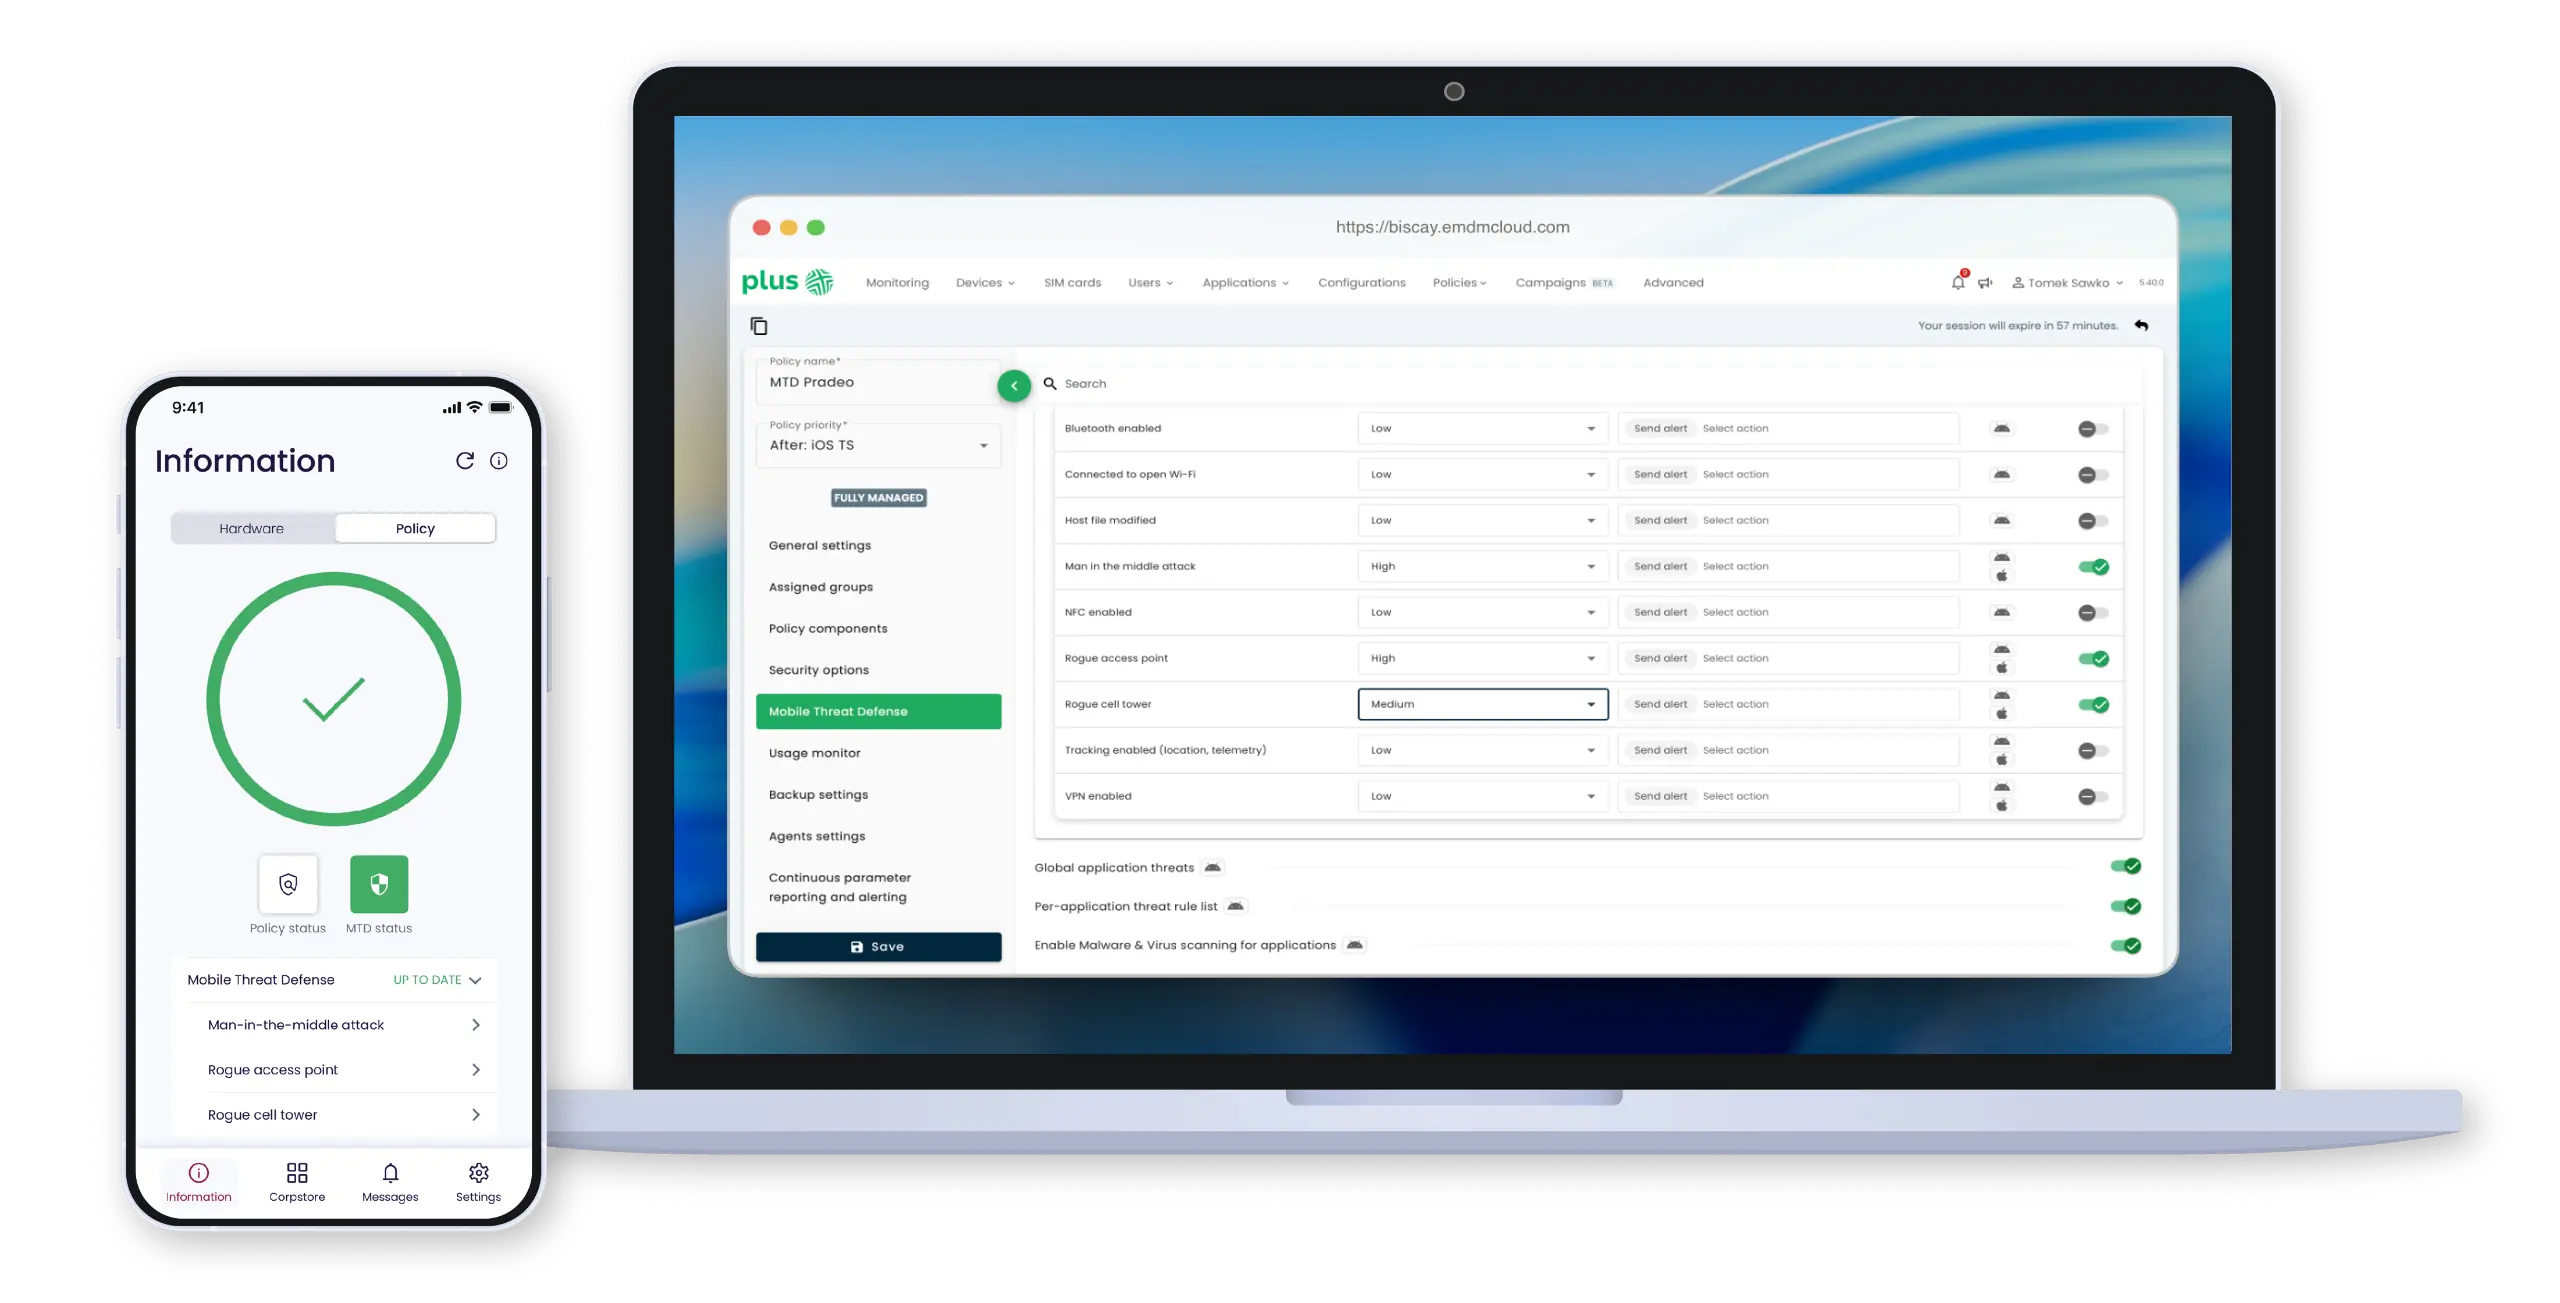
From the admin’s perspective:
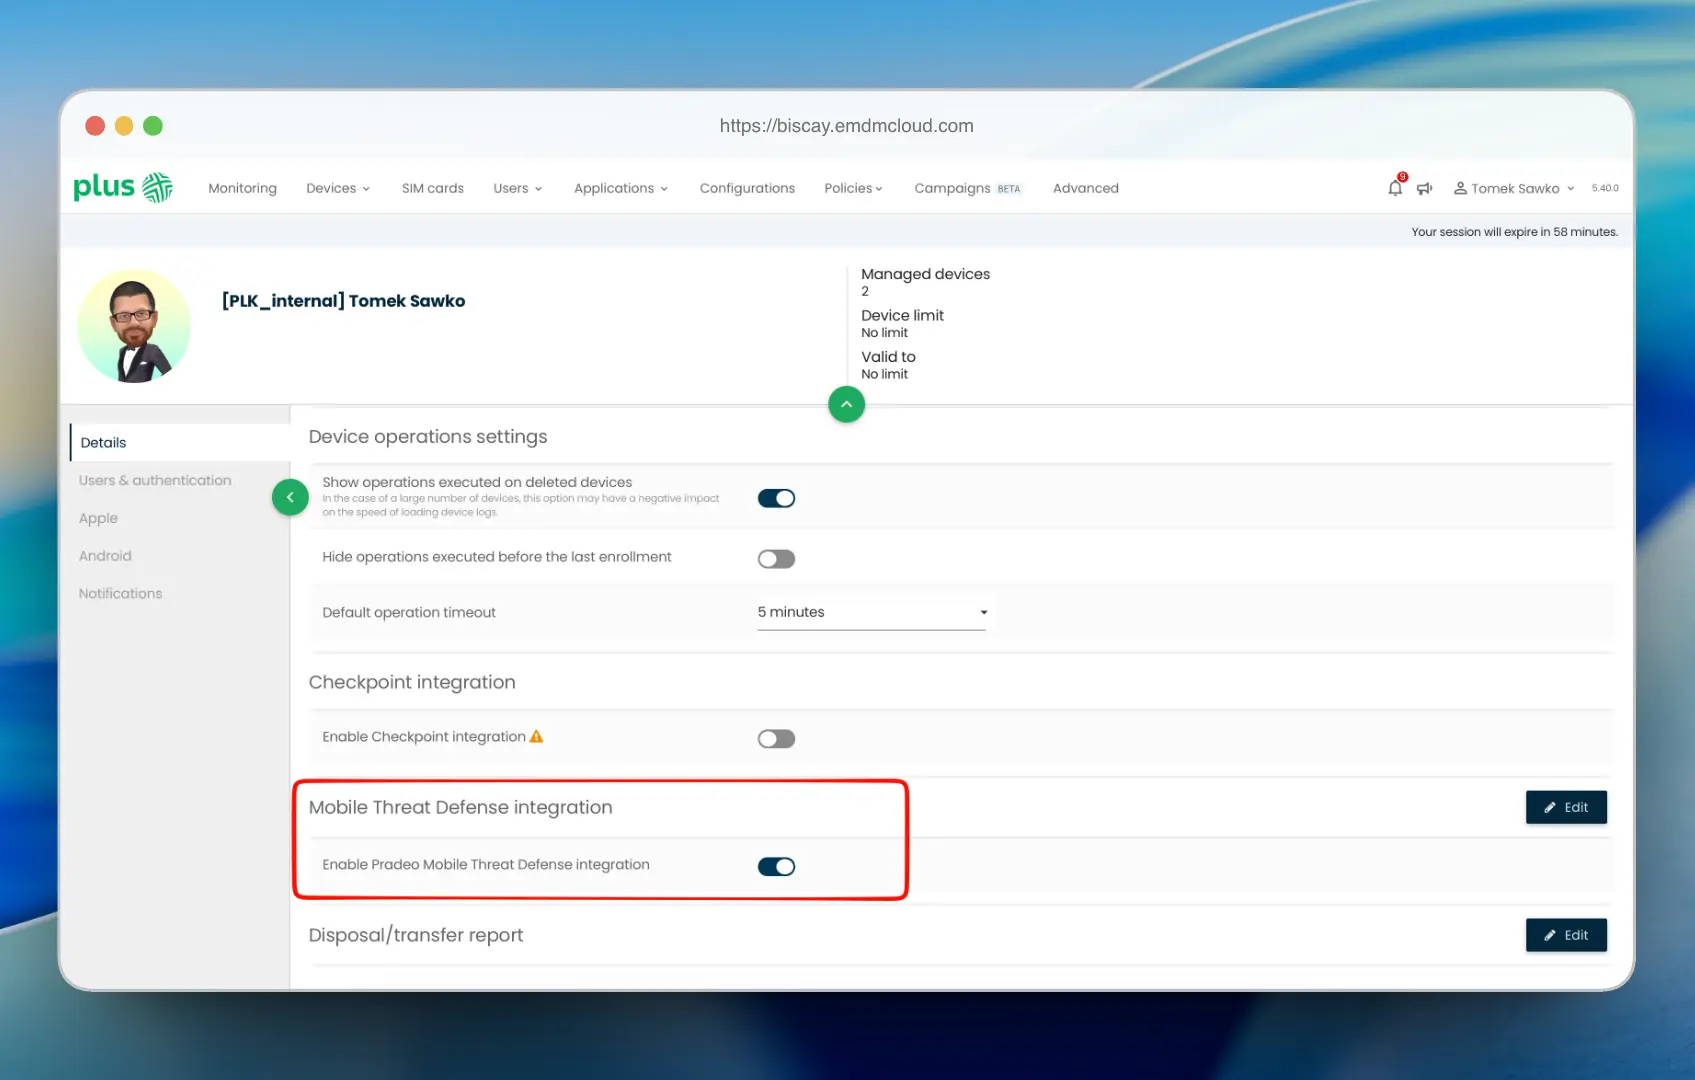
The agent on devices receives the signal, activates the Pradeo module, and starts protecting. This is the famous Zero Touch in practice. You don’t have to ask users: „Please install this antivirus.” You do it for them, remotely, with one click.
Since we’re on technical details, let’s go deeper. The effectiveness of this solution is based on RASP (Runtime Application Self-Protection) technology.
I know, it sounds like gibberish, but in practice it’s a piece of solid engineering. RASP means that protection works inside the application (in this case the MDM agent) in real-time.
Pradeo in this edition works on two tracks:
1. CORE level (local)
This is the first line of defense. It works directly on the device, even offline.
2. ADVANCED level (cloud + AI)
This is the „brain” of the operation. If the agent on the phone sees something suspicious that it doesn’t recognize (e.g., an app starts behaving strangely), it sends metadata (not files, only information about behavior!) to Pradeo’s cloud. There, artificial intelligence (Machine Learning) analyzes it in the context of millions of other events. Thanks to this, it detects so-called Zero-Day Threats – threats that are so new they don’t yet have signatures.
Thanks to this division, the solution doesn’t kill the battery. Heavy analytics happen in the cloud, while a lightweight agent runs on the phone checking basics and reporting anomalies.
Below is an illustrative chart showing real-time attack activity at the application layer.
Theory is theory, but what does this give in practice?
During one of the webinars organized by Techstep, a great example of TikTok or Temu was given. These aren’t viruses. Google Play allows them. But these apps can extract huge amounts of data (phone book, location, clipboard). Essentials MTD can block such apps on the work profile or completely prevent their installation, not based on „whim,” but on real analysis of what the app does with data.
Remember the story of German soldiers who connected to hotel Wi-Fi and their conversations leaked? That’s a classic Man-in-the-Middle. Pradeo detects that the SSL certificate of the site you’re connecting to has been replaced, or that the GSM base station you’re connected to is not a real operator station, but a „spy suitcase” (IMSI Catcher).
Quishing (QR Code Phishing)
A new plague. An employee scans a QR code on a parking meter (fake, stuck over the real one), which redirects them to a page phishing for M365 login credentials. Pradeo analyzes the URL before the page loads and blocks access.
Finally, an argument that for many companies (especially government and financial) may be decisive.
Both TechStep (Norway/Poland) and Pradeo (France) are European companies. Pradeo’s infrastructure is located in Europe (mainly France and Germany). This means full compliance with GDPR and upcoming NIS2 and DORA directives.
In an era when transferring data to the US or China raises (justified) concerns, having a security provider that is subject to EU jurisdiction is a huge advantage. Your threat data doesn’t land on servers overseas.
The integration of TechStep Essentials MDM with Pradeo is for me one of the most interesting moves on the market recently. We’re turning two separate entities (management and security) into one cohesive organism – this is the first solution I’ve seen where security isn’t glued on with duct tape, but sits inside the MDM agent.
Why is it worth it?
If you already have Essentials MDM, ask your account manager (e.g., at Plus operator, which is a certified Techstep partner) about testing the MTD module. It’s usually a matter of a few clicks, and the security level of your fleet jumps up several levels.
And if you don’t have it – well, maybe it’s a good time to rethink your strategy before someone scans a „fake” QR code in the company parking lot.
Until next time!